
Auschwitz I: Complete Visitor Guide

Auschwitz I is the original main camp, built in former Polish army barracks in 1940. It is now home to the museum’s permanent exhibitions across 30 preserved brick buildings, and serves as the starting point for every visit to the memorial. Key sites include the “Arbeit Macht Frei” gate, Blocks 4, 5, 6 and 11, the Wall of Death, and Crematorium I — the first gas chamber built at Auschwitz. A standard visit to Auschwitz I takes approximately 1.5–2 hours.
Every visit to Auschwitz-Birkenau begins here. Auschwitz I is the administrative and historical core of the entire complex — the camp where the Nazi regime first established its operations in occupied Poland, and the site that now houses the memorial’s most significant exhibitions. This guide walks you through every key location, explains what each contains, and prepares you for what you will encounter.
Background: What Was Auschwitz I?
Auschwitz I was established in May 1940 in the buildings of a former Polish army garrison on the outskirts of Oświęcim. The first prisoners — 728 Polish political prisoners — arrived on 14 June 1940. By 1941, the camp housed thousands; by 1943, it functioned as the administrative headquarters of a sprawling complex that included Birkenau and Monowitz.
Unlike Birkenau, which was purpose-built for mass extermination, Auschwitz I served multiple functions simultaneously: a detention and forced-labour camp for Polish political prisoners, a site of criminal medical experiments, a prison within the prison in Block 11, and — from September 1941 — the location of the first experimental gassings using Zyklon B.
Today, the grounds and buildings of Auschwitz I are preserved in their original state, with the brick blocks now housing the museum’s permanent exhibitions and national pavilions. The camp is open to visitors year-round.
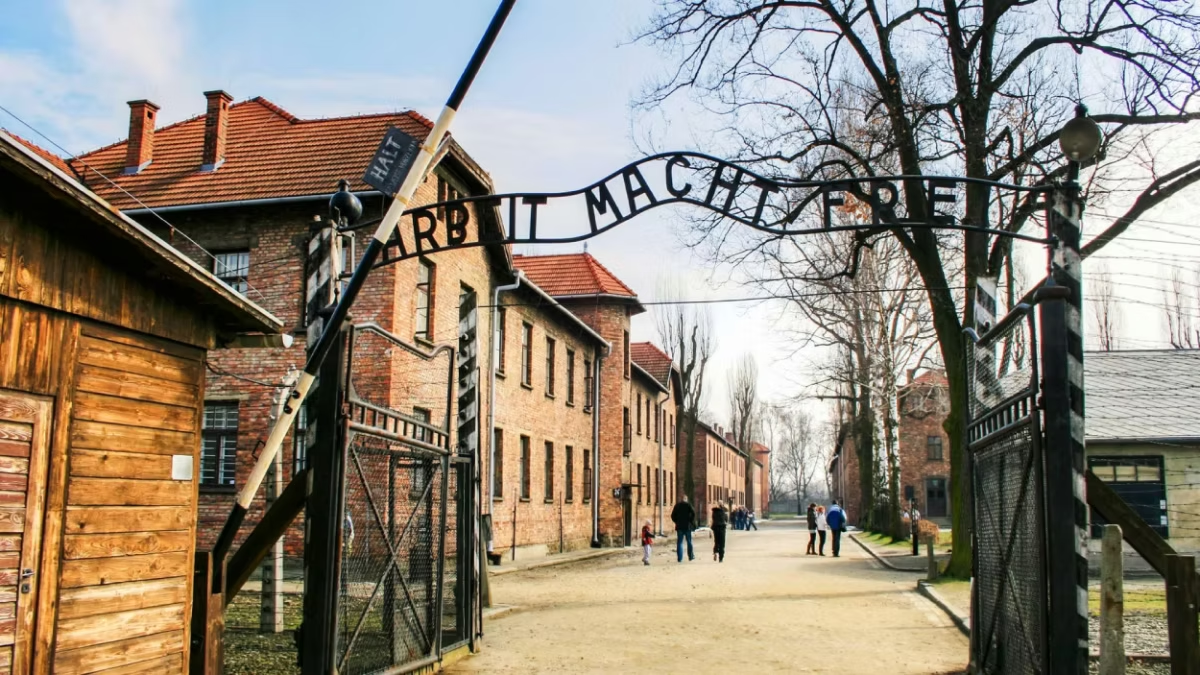
The “Arbeit Macht Frei” Gate
The notorious inscription “Arbeit Macht Frei” — Work Sets You Free — was hung above the main gate of Auschwitz I as a deliberate act of cynical deception. The gate was one of the last things prisoners saw on their way into the camp and one of the first things survivors see today on their return. It is the most photographed site at Auschwitz-Birkenau.
The gate visible today is a replica. The original was stolen in 2009 and later recovered, cut into three pieces. The original is now held in secure storage by the museum. The replica, installed after the theft, is otherwise identical.
Many visitors find the gate more affecting than they anticipated — not because the inscription is visually dramatic, but because standing beneath it collapses the distance between historical knowledge and physical reality. For a full account of the gate’s history and significance, see our dedicated Arbeit Macht Frei gate article.
Block 4: Evidence of Mass Extermination
Block 4 houses the museum’s permanent exhibition on the process and evidence of mass extermination. The exhibition documents:
- The deportation of Jews from across occupied Europe to Auschwitz-Birkenau
- The selection process at the railway ramp at Birkenau, and the fate of those selected for immediate death
- The operation of the gas chambers — maps, photographs, and documents showing the industrial scale of the killing
- A room containing approximately two tonnes of human hair shorn from victims before their murder, displayed behind glass in a long corridor
The hair room in Block 4 is one of two locations at Auschwitz-Birkenau where personal photography is strictly prohibited. The prohibition exists as an act of dignity for the victims whose hair is on display. Signs at the entrance to the room make this clear.
Block 4 is one of the most psychologically intense spaces in the museum. The hair room, in particular, confronts visitors with evidence that cannot be abstracted into statistics. Many visitors describe it as the single most affecting display at the entire site.
Block 5: Material Evidence of the Crime
Block 5 contains what the museum calls the “material evidence of the crime” — the physical belongings confiscated from prisoners on arrival. The scale of the display is staggering:
- 80,000+ shoes — filling a large room floor to ceiling
- 3,800 suitcases — many bearing the names, addresses, and dates of birth of their owners
- Glasses, prosthetic limbs, shaving brushes, pots and pans
- Children’s clothing
These objects are not replicas or illustrations. They are the actual belongings of the people who were murdered at Auschwitz-Birkenau. The names on the suitcases are real names of real individuals. The glasses belonged to real people. This is evidence, preserved in place, of what was taken from over a million human beings.
Block 6: The Lives of Prisoners
Block 6 documents the experience of prisoners who were registered at the camp rather than sent immediately to the gas chambers. The exhibition covers:
- The registration process — being tattooed with a prisoner number, stripped of all possessions and personal identity
- The conditions of daily life — the barracks, the work details, the hunger, the violence
- Photographs taken of prisoners at registration, displayed in rows: men, women, and children, each with their arrival date and — in many cases — the date of their death
The photographs in Block 6 are among the most humanising displays in the museum. Unlike the piles of objects in Block 5, these are individual faces — people whose names, ages, and brief imprisonment records are preserved. Many visitors spend considerable time here.
Block 11: The Death Block
Block 11 was the camp prison — the most feared building in Auschwitz I. It housed the SS court that sentenced prisoners to death, the standing cells in the basement, and the starvation cells. The courtyard between Block 10 and Block 11 was the site of the Wall of Death, where thousands of prisoners were executed by shooting. It is one of the most disturbing spaces in the entire memorial.
Specific features of Block 11:
The standing cells — Located in the basement, these are four brick-walled spaces approximately 90 cm × 90 cm. Up to four prisoners were forced into each cell through a small hatch at floor level, forced to stand throughout the night as punishment, then required to report for work the following day. Death from exhaustion in these cells was common.
The starvation cells — Also in the basement, these were cells in which prisoners condemned by the SS court were left without food or water until death. In Cell 18, Maximilian Kolbe — a Polish Franciscan friar later canonised by the Catholic Church — voluntarily took the place of a condemned fellow prisoner and died here in August 1941.
Photography prohibited: The basement of Block 11 is the second location at Auschwitz-Birkenau where photography is prohibited. Signs at the basement entrance make this clear.
For a full account of Block 11’s history and what each space was used for, see our dedicated Block 11 article.
The Wall of Death
The Wall of Death stands in the courtyard between Blocks 10 and 11. This is where thousands of prisoners — primarily Poles — were brought from across the camp complex to be executed by shooting. The original wall was demolished in 1944 as the SS attempted to destroy evidence of their crimes; the current wall is a reconstruction on the original site.
Flowers and memorial candles are placed at the wall by visitors year-round. It is a space of quiet and reflection. Visitors on guided tours typically pause here for a period of silence.
The National Pavilions
Several blocks at Auschwitz I have been designated as national pavilions — permanent exhibitions created by the countries whose citizens were murdered at Auschwitz, each presenting the history from their own national perspective. Not all pavilions are open at all times; check the current schedule at auschwitz.org.
National pavilions exist for: Poland, Hungary, France, the Netherlands, Belgium, Italy, Austria, Slovakia, the Czech Republic, and several other nations. The Hungarian pavilion is particularly significant — Hungary was the largest single source of Jewish deportees to Auschwitz, with 437,000 Hungarian Jews deported between May and July 1944. These pavilions are typically accessible on study tours rather than the standard guided tour.
Crematorium I and the First Gas Chamber
The tour of Auschwitz I concludes at Crematorium I — the first gas chamber and crematorium built at the complex. In September 1941, Zyklon B was used here for the first time to kill Soviet prisoners of war, demonstrating the chemical’s effectiveness for mass murder.
The building fell out of use as a killing facility in 1942 when the much larger Birkenau crematoria became operational. The SS later converted it for use as an air-raid shelter. After liberation, Soviet investigators partially reconstructed the building to its original configuration.
Visitors can enter the gas chamber itself. Standing in the low-ceilinged concrete room where the systematic mass murder of human beings was first tested is an experience that almost every visitor describes as qualitatively different from any other space at the site.
Photography inside the gas chamber is permitted, though many visitors choose not to take photographs here. The weight of the space — and the awareness of what happened within it — leads many visitors to simply stand and be present rather than document.
For the full history and significance of this building, see our Gas Chamber and Crematorium I article.
Practical Information for Auschwitz I
Duration: Allow approximately 1.5–2 hours for Auschwitz I as part of a 3.5-hour guided tour. The full guided tour covers both Auschwitz I and Birkenau.
Entry: A pre-booked personalised entry pass is required. All entry passes must be reserved at visit.auschwitz.org.
Bag size: Maximum 35×25×15 cm inside the museum. Larger bags must be left in your vehicle or the on-site luggage storage room.
Photography: Permitted throughout except in Block 4’s hair room and Block 11’s basement. No flash, no tripod.
Shuttle to Birkenau: After completing the Auschwitz I section, a free museum shuttle bus connects to Birkenau for the second part of the tour. Read our shuttle bus guide for details.
Frequently Asked Questions
How long does it take to visit Auschwitz I?
As part of a standard 3.5-hour guided tour covering both Auschwitz I and Birkenau, approximately 1.5–2 hours is spent at Auschwitz I. Self-guided visitors often spend 2–3 hours at Auschwitz I alone. The museum recommends a minimum of 90 minutes per site.
What is in Auschwitz I?
Auschwitz I houses the museum’s permanent exhibitions across 30 original brick buildings. Key sites include the “Arbeit Macht Frei” gate, Block 4 (evidence of mass extermination including the hair room), Block 5 (victims’ belongings), Block 6 (prisoner lives), Block 11 (the Death Block), the Wall of Death, and Crematorium I — the original gas chamber.
Can you go inside the gas chamber at Auschwitz I?
Yes. Crematorium I — the original gas chamber at Auschwitz — is open to visitors and you can walk through the interior. Personal photography is permitted inside the building, though many visitors choose not to take photographs in the gas chamber itself.
What should I see at Auschwitz I?
Block 4 (the hair room and evidence of extermination), Block 5 (shoes, suitcases, and personal belongings), Block 11 (the Death Block and standing cells), the Wall of Death, and Crematorium I. If you are on a standard guided tour, your educator-guide will take you to all key sites; self-guided visitors should prioritise these areas given the 90-minute minimum recommendation.